Oct 28, 2019

Vintage Mannequin video tutorial for Finnabair's CT


Hello crafty friends! 
It’s my first project for Finnabair's CT and I’m so very excited, honored and happy!
For my debut project I’ve created a project I wanted to make for some time now and somehow, I kept putting it aside.
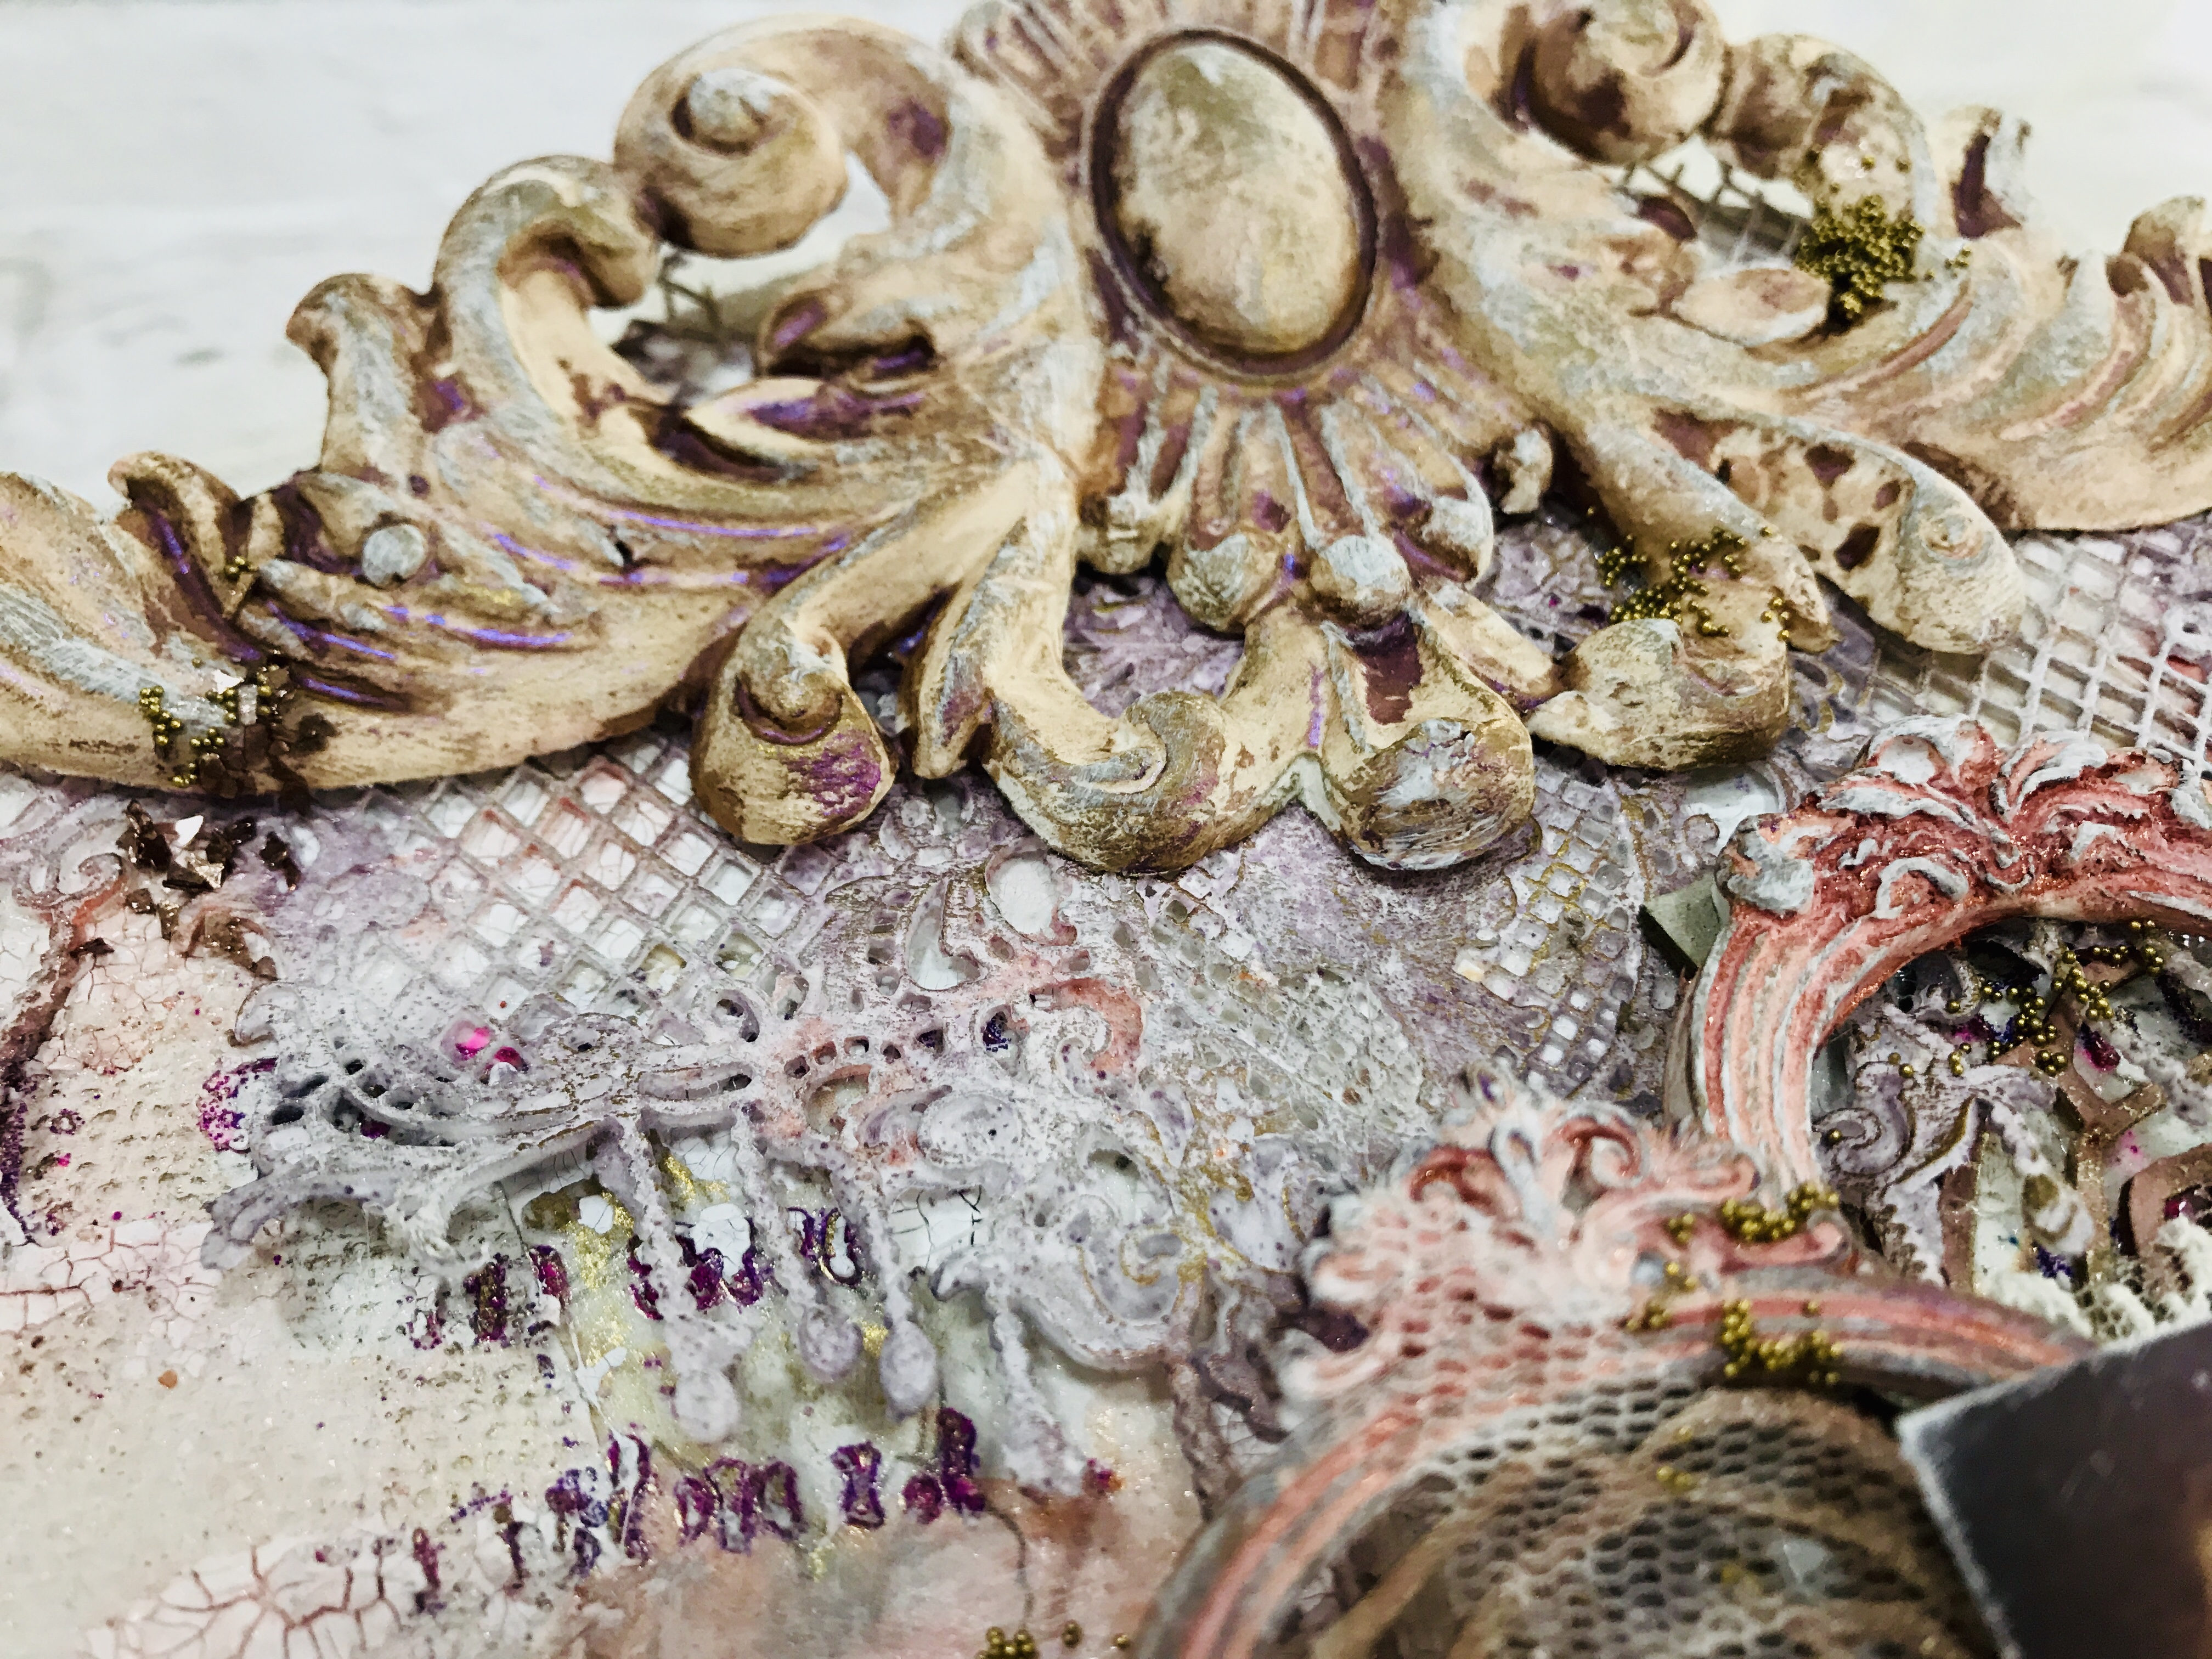
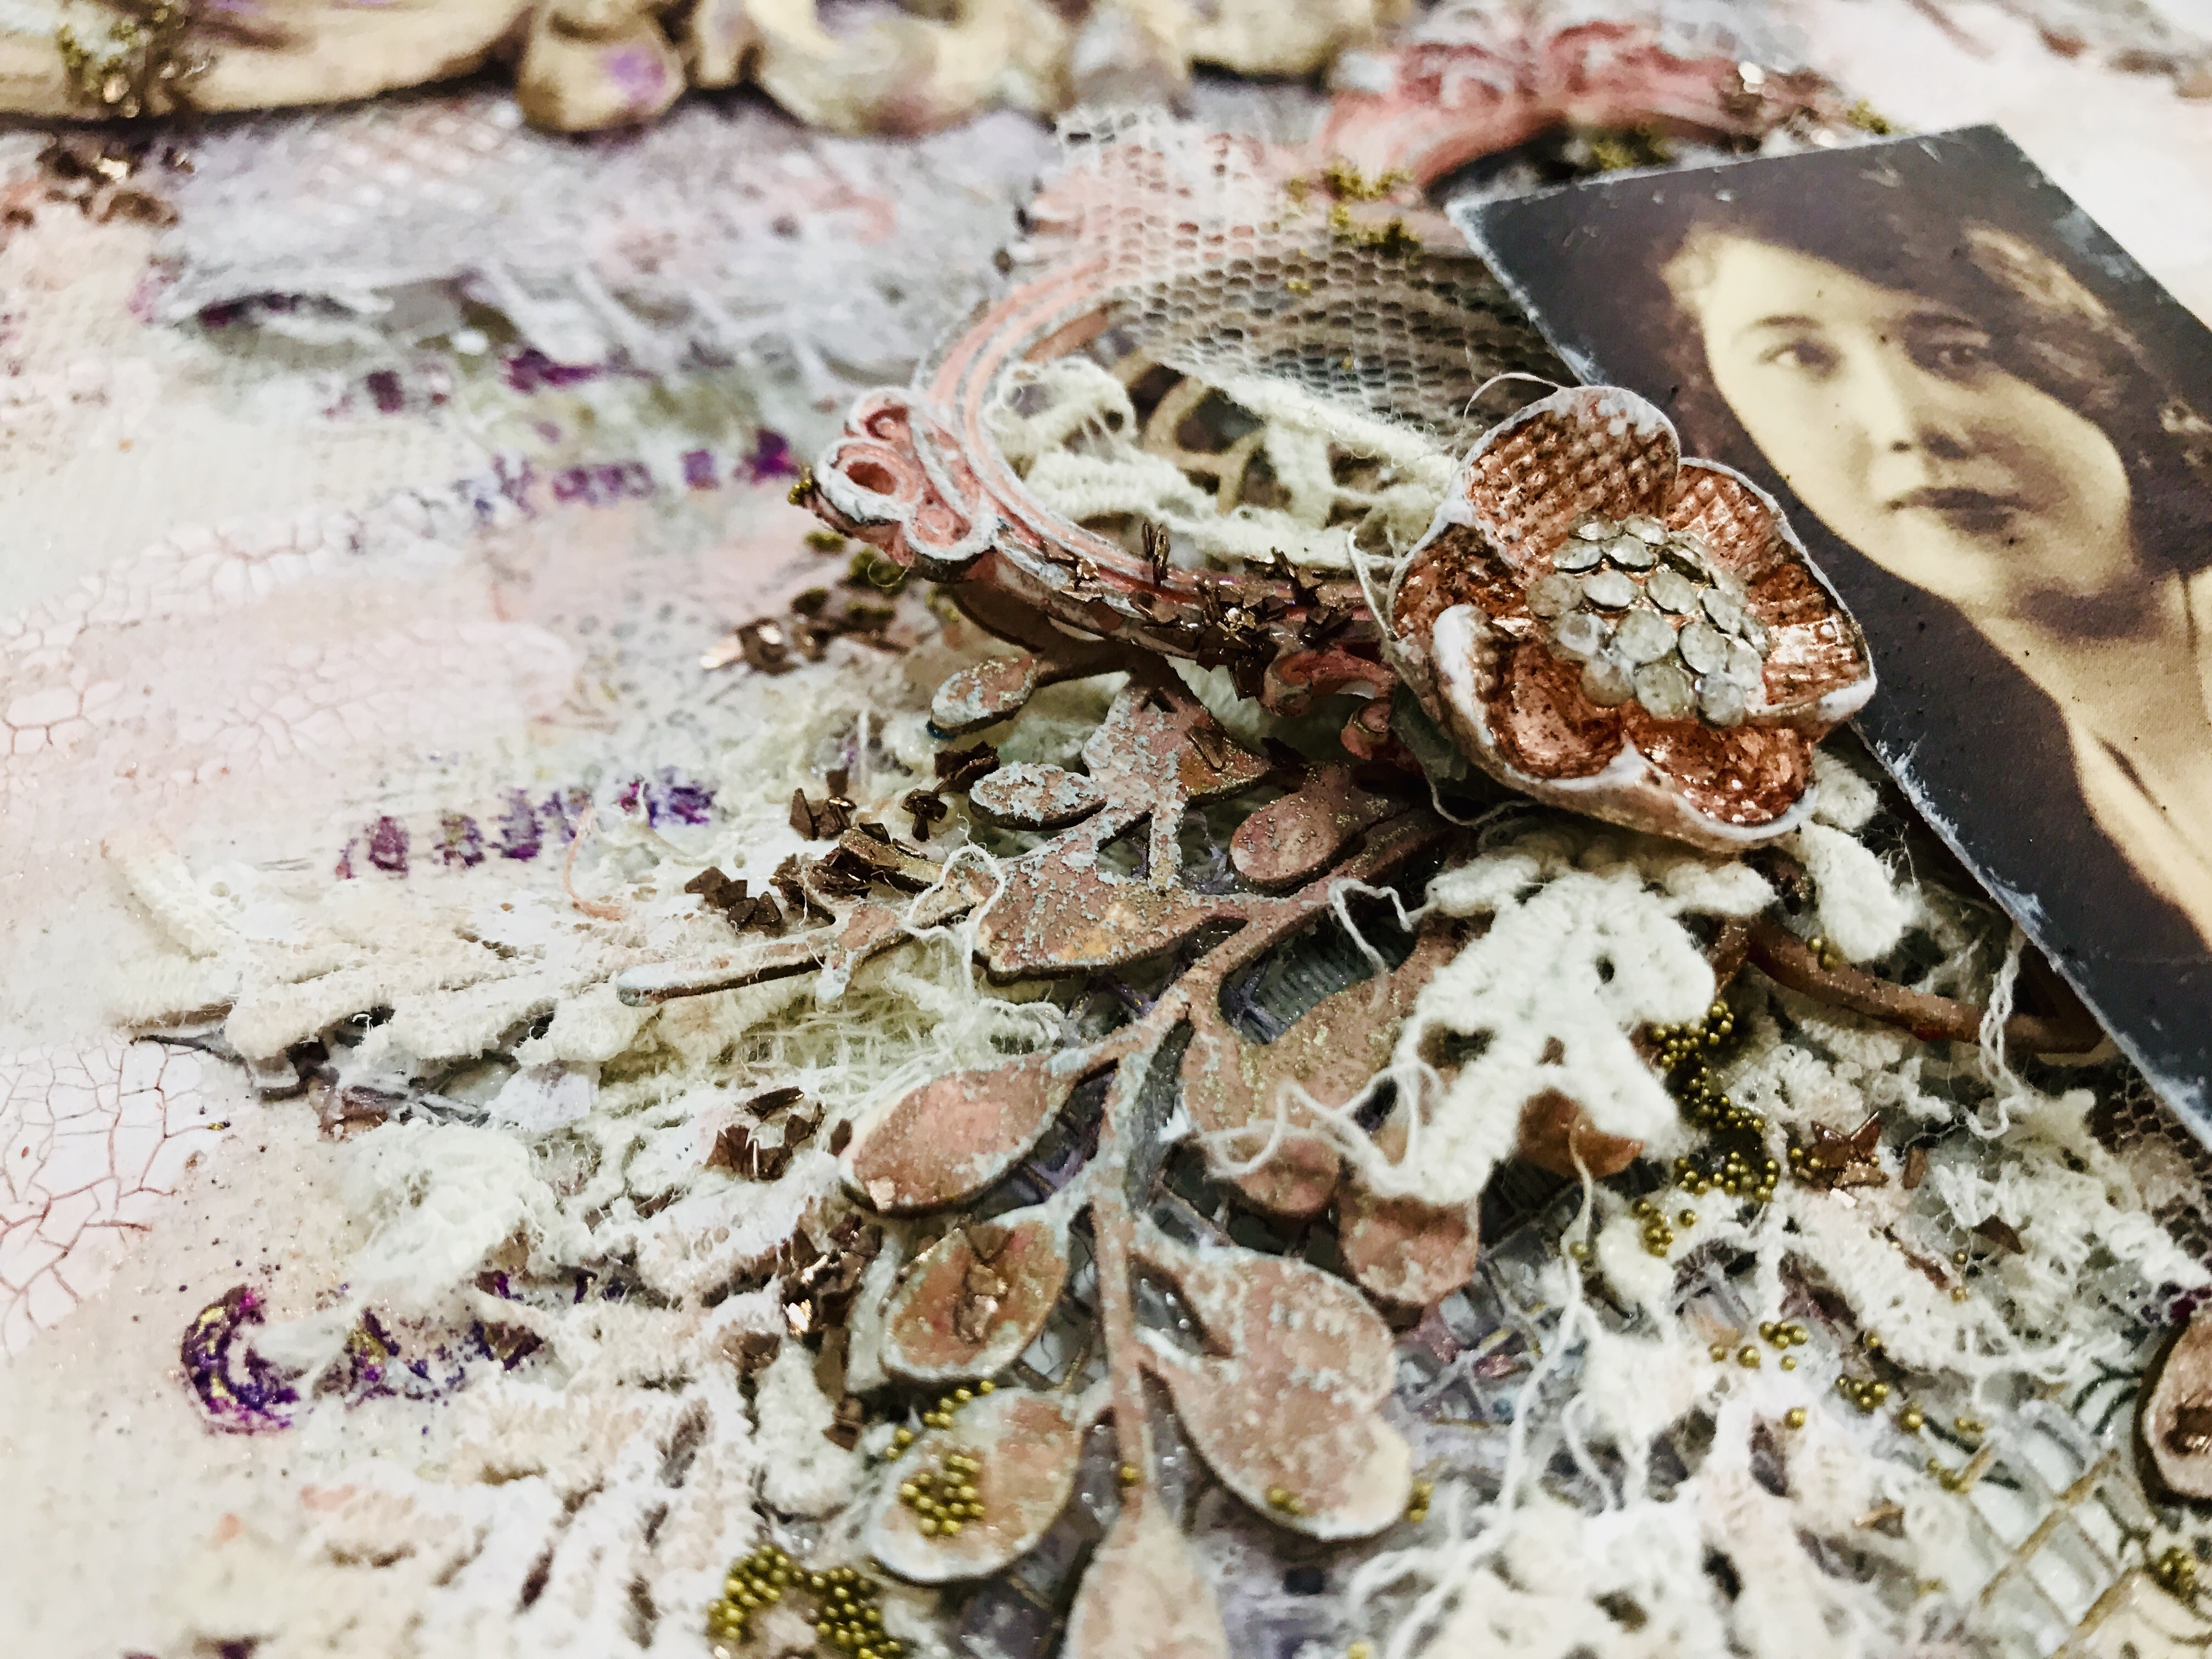
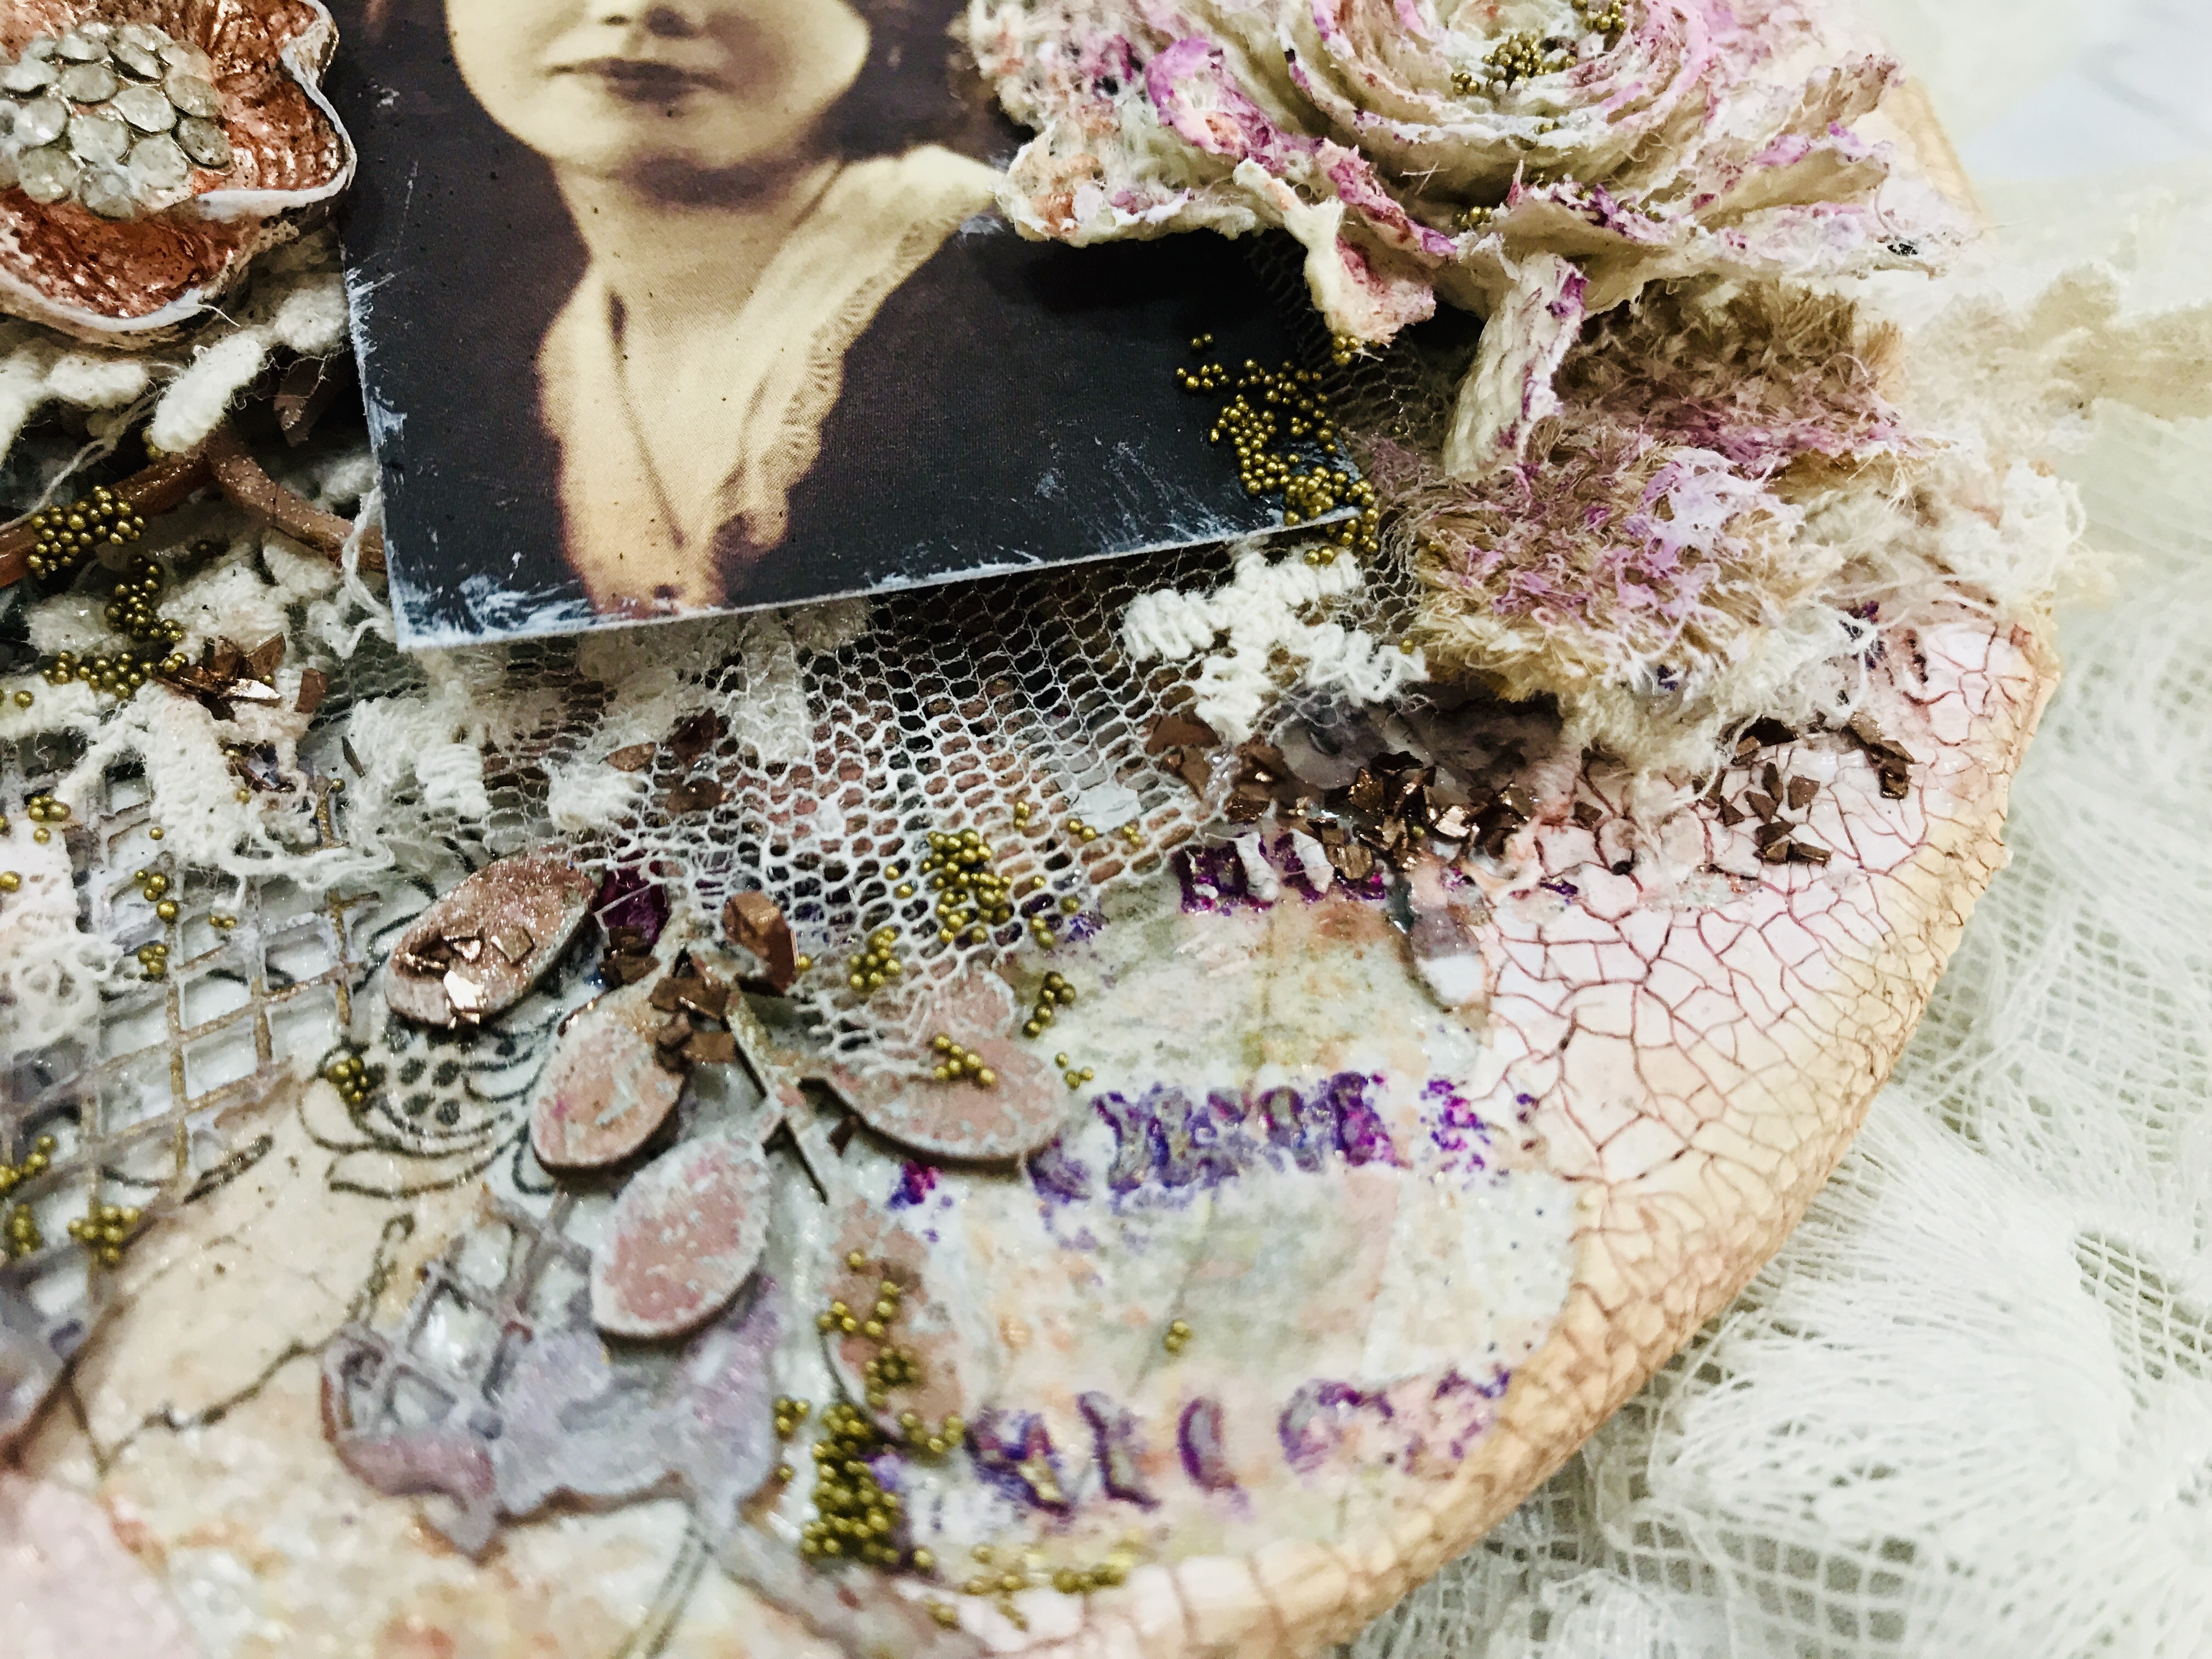
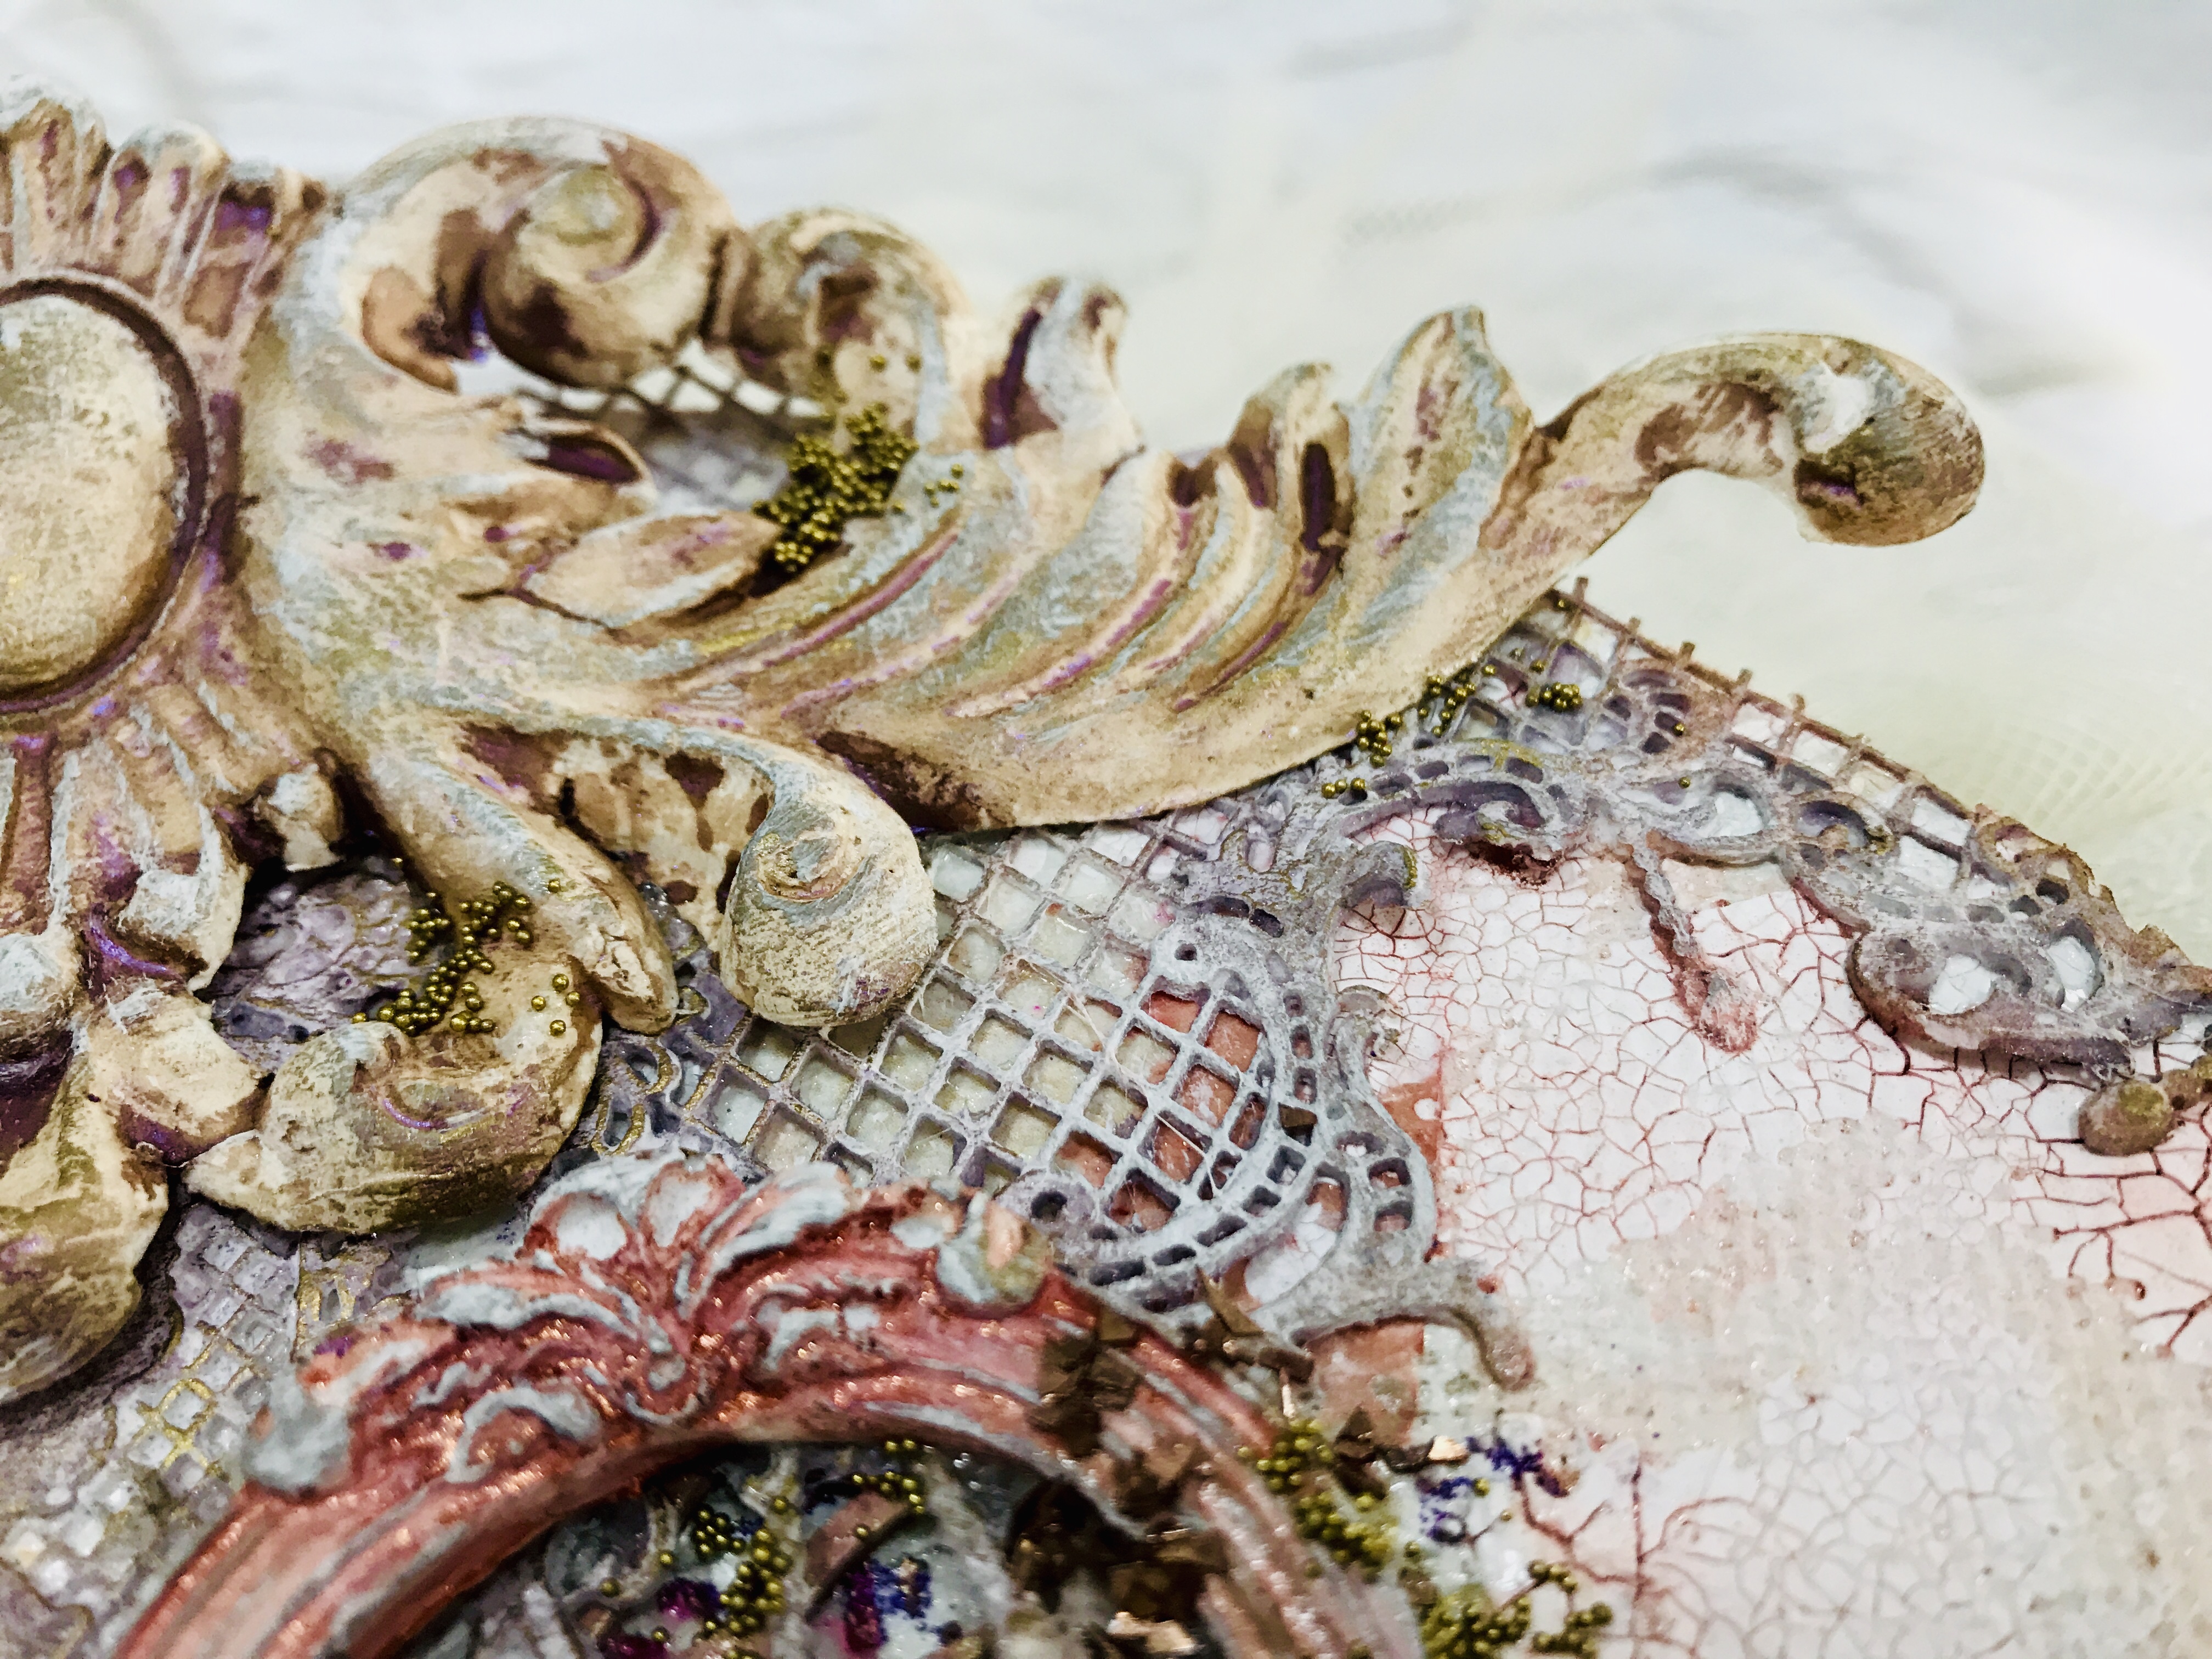
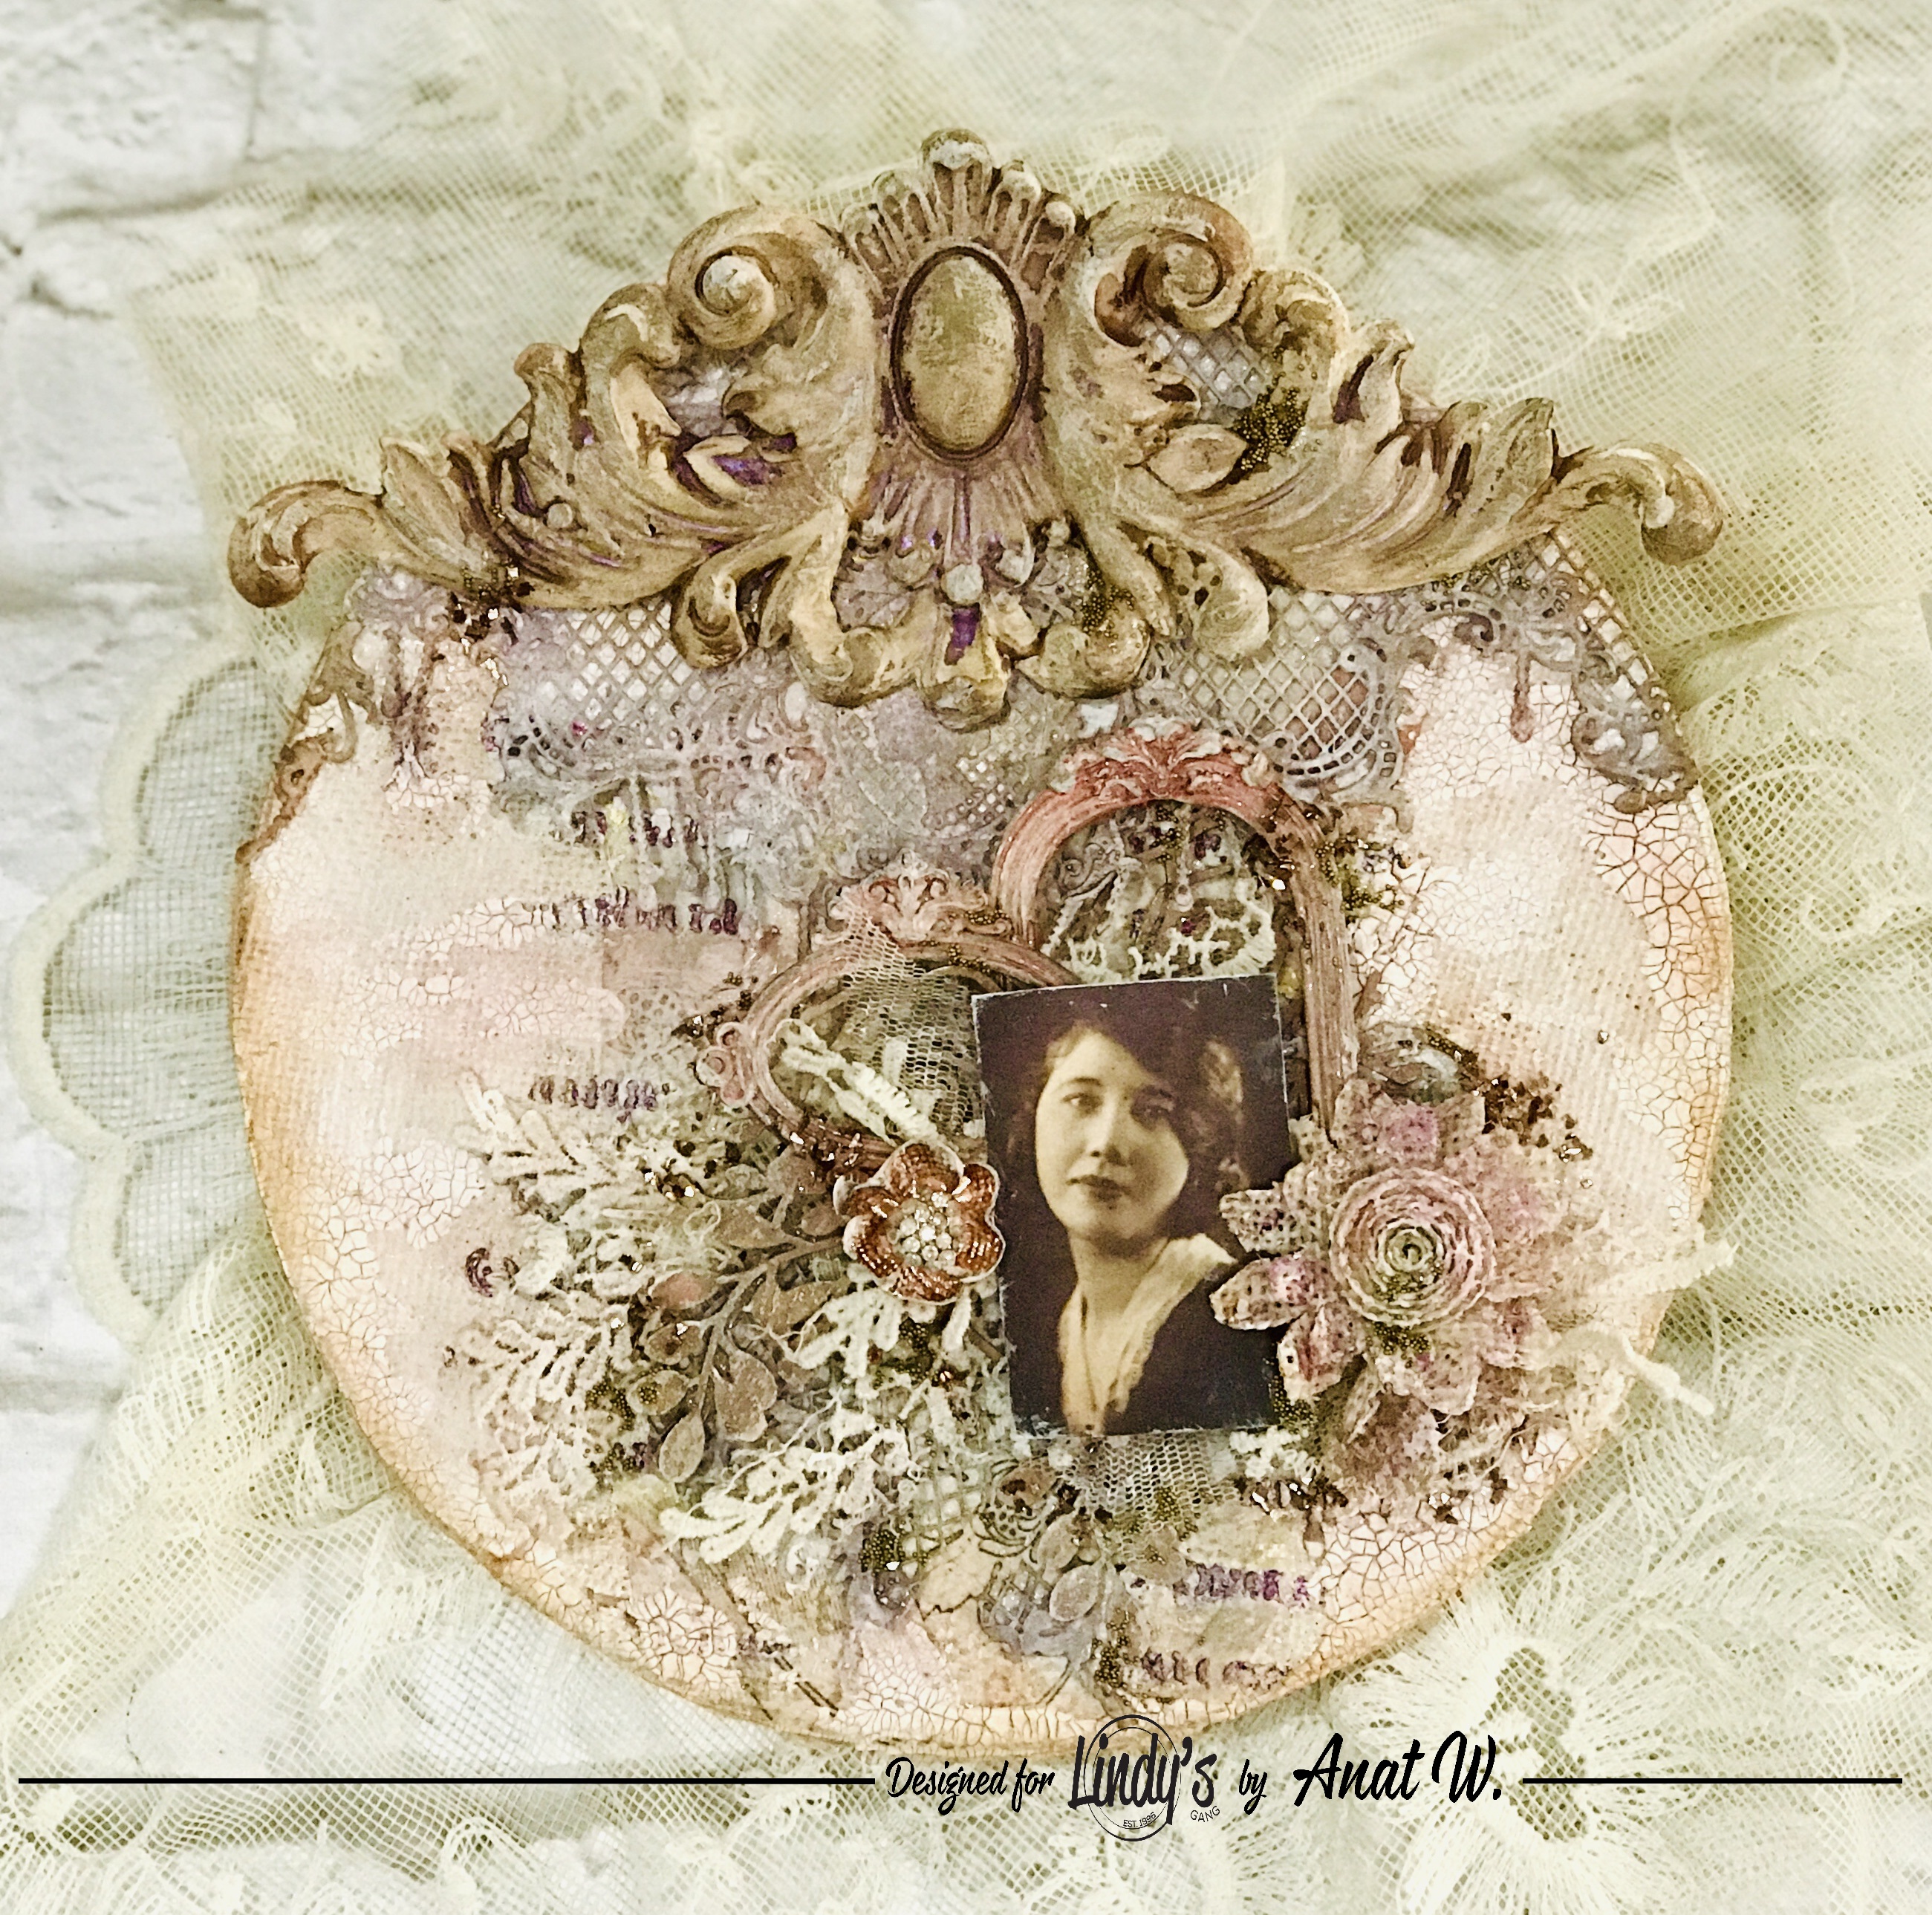
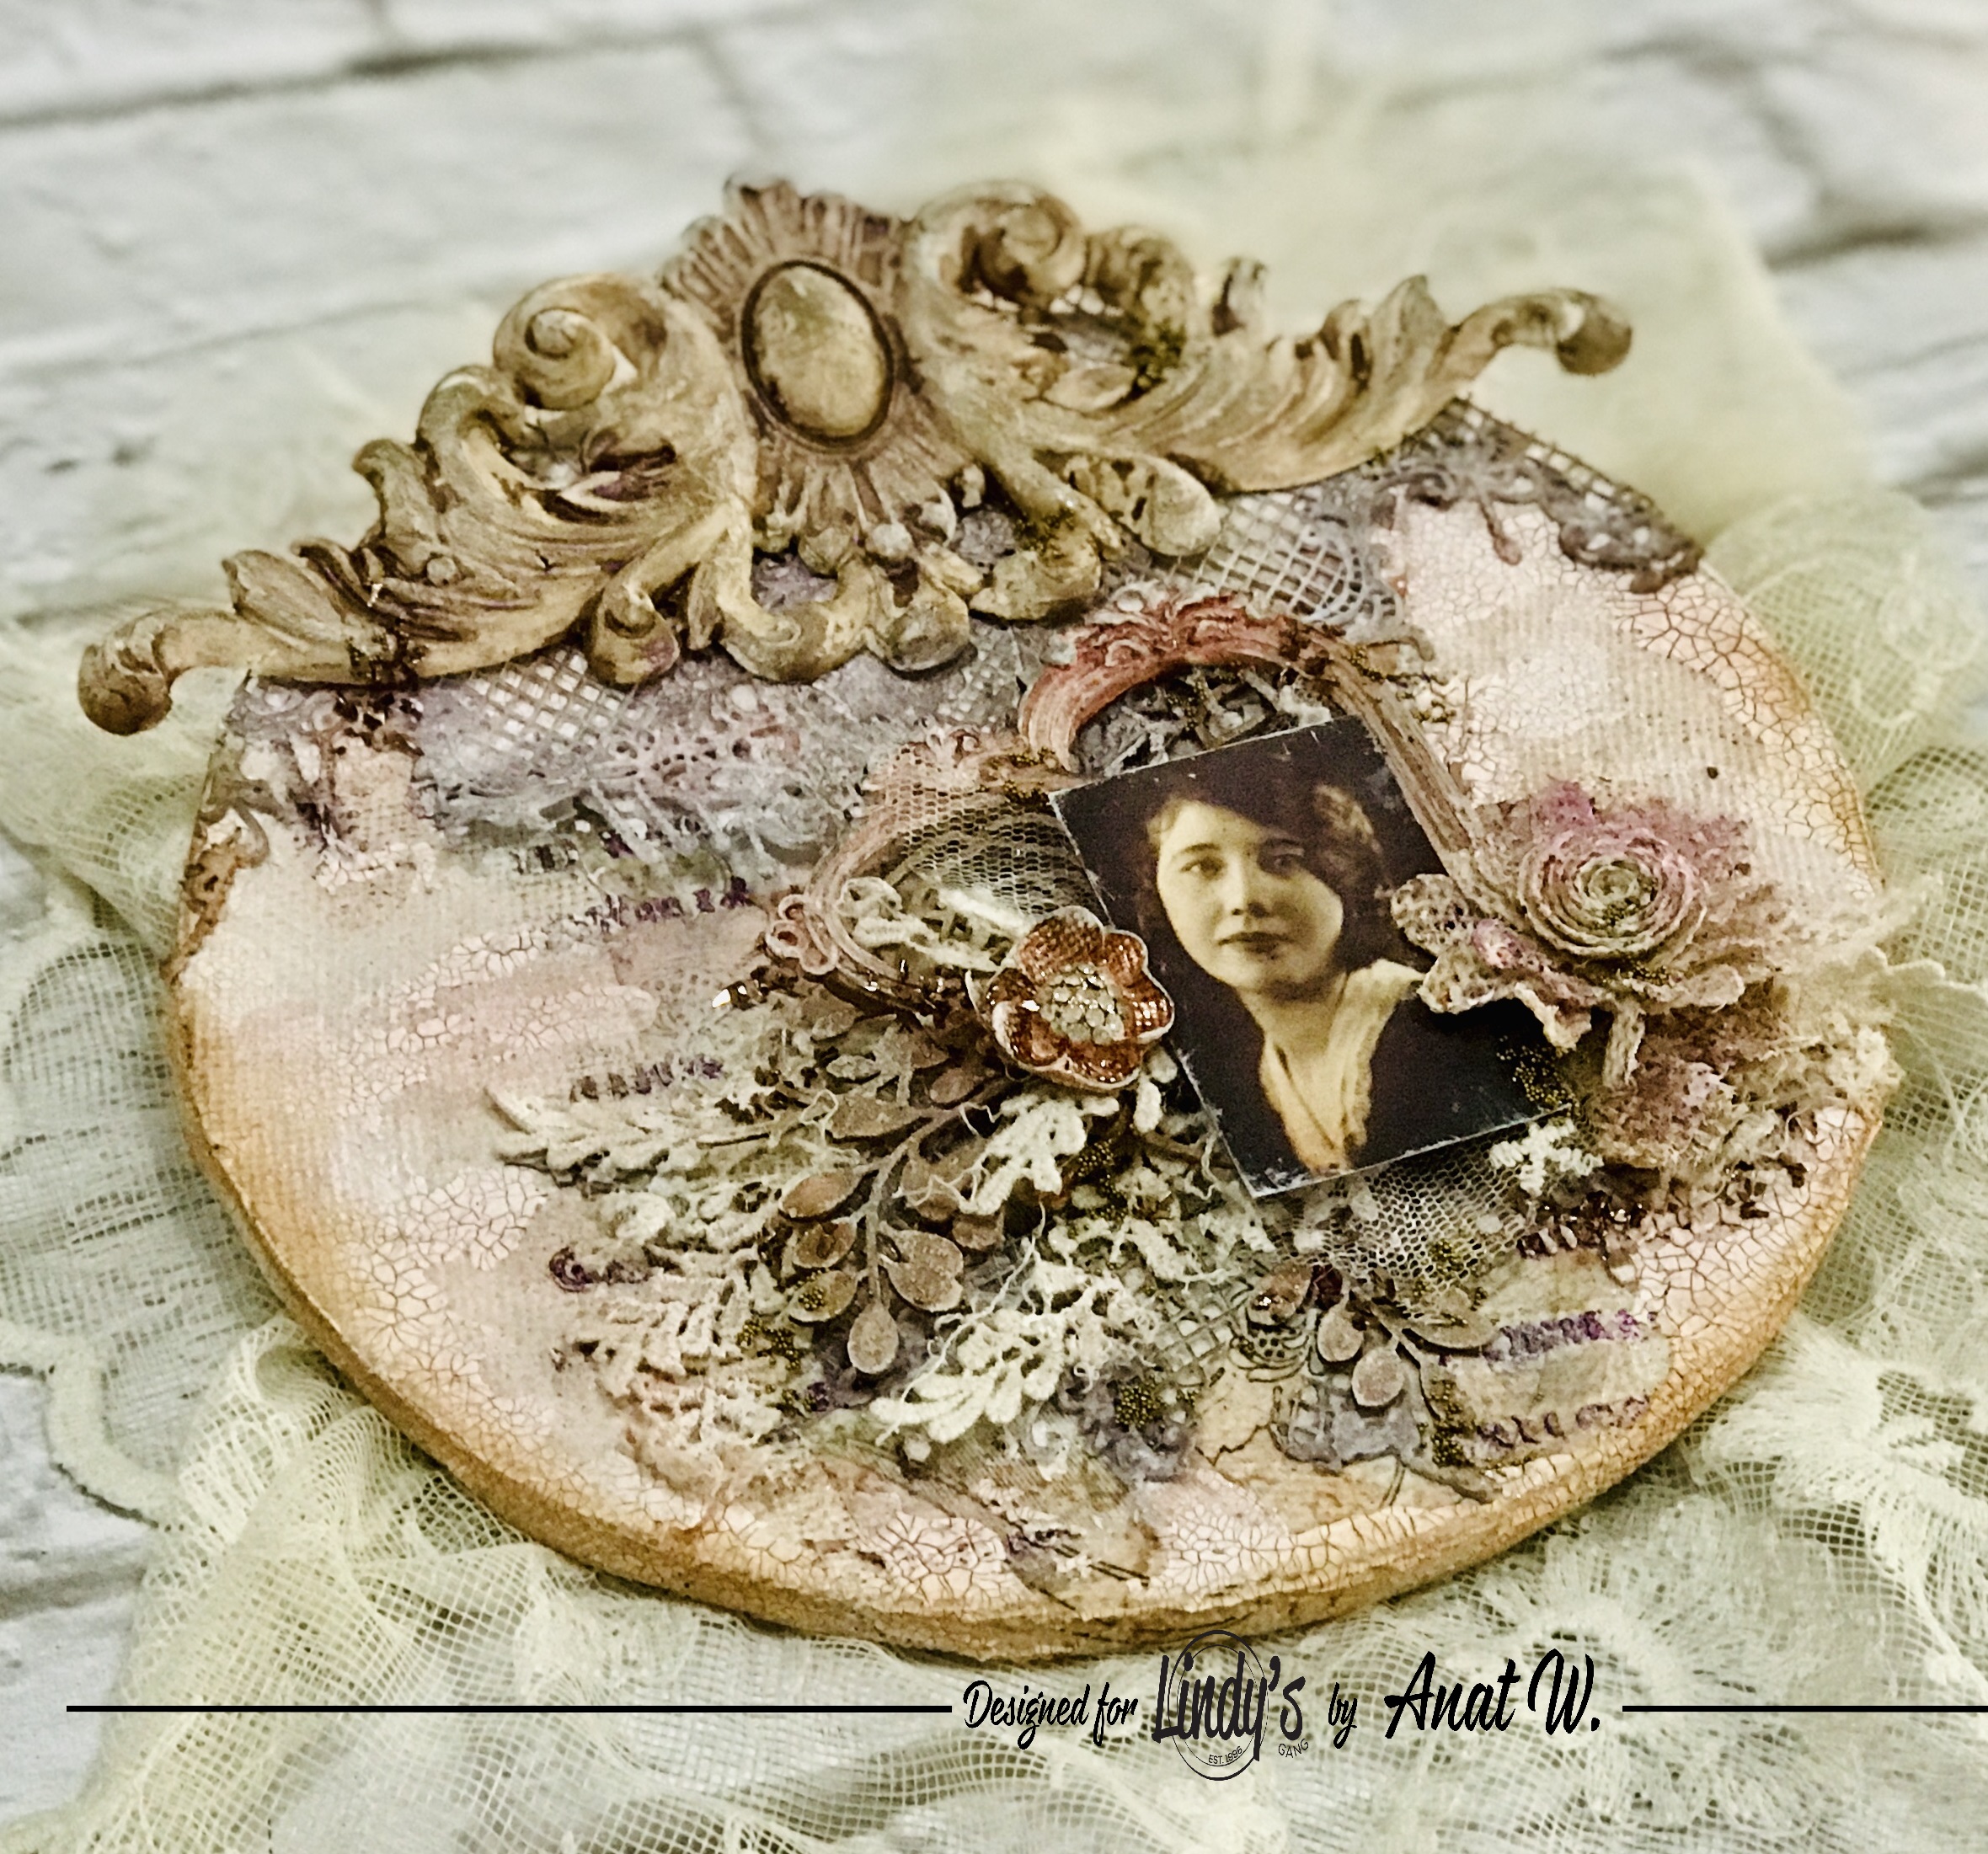
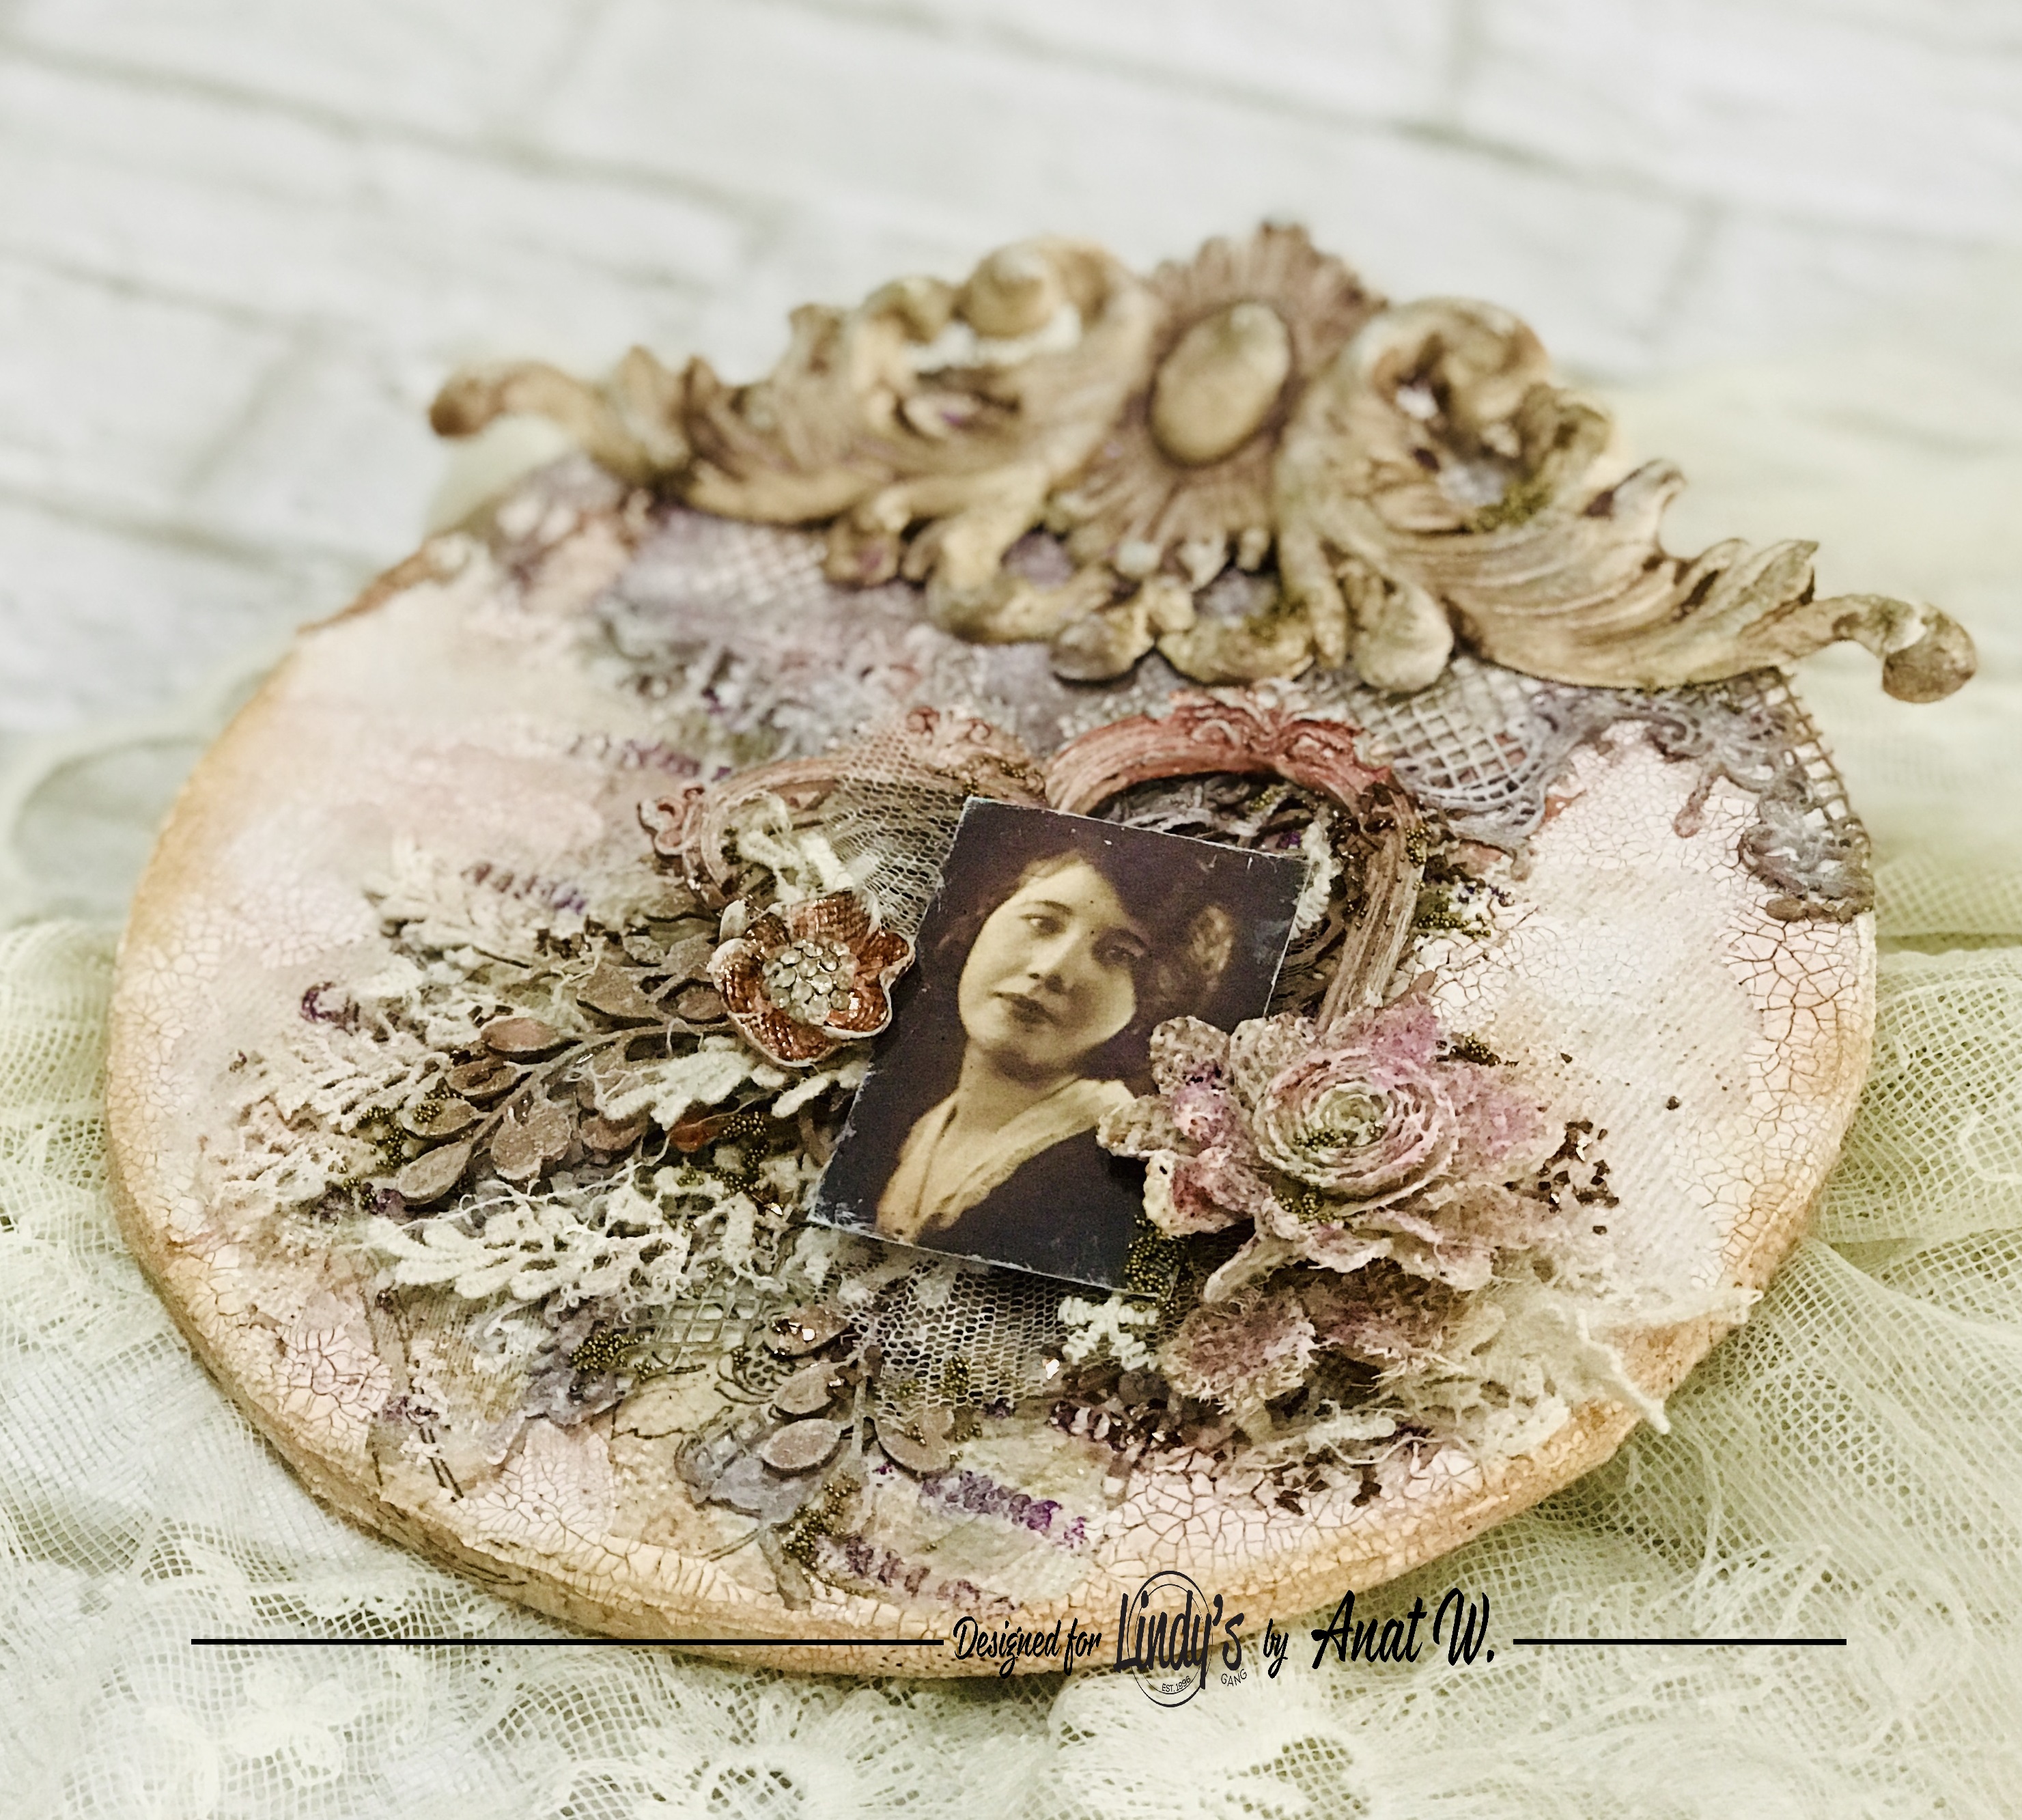

 It’s a Vintage Mannequin – an altered MDF base with lots of Finnabair’s goodies. (Find the supplies list below)

It may have some different steps, but all are pretty simple and together they create this Vintage look I love so much.


To achieve an interesting look, suggesting a corset and Jewelry style I added Tissue paper, Gaze fabric and Icing Paste to the background. Using a simple cardboard, peeling and painting it, I’ve created the corset.

For building the composition I glued a few chipboards, added metal chains on top and assembled many different Mechanicals elements mold prints and more.

After drying I colored all elements with Art Alchemy Metalique and sparks paints, created a shadowing around and added dry brush White Heavy Gesso.

Watch the step by step process to see how I made it:


 Here are some more pictures of the project:


Thank you for stopping by!
Xoxo

Mixed Media Place Supplies:

Oct 24, 2019

Vintage canvas and a Video tutorial


It’s Anat here and for today’s blog post, I’m sharing a new Video Tutorial showing how to create aVintage feminine round Canvas  using gorgeous Lindy’s Magicals, Sprays and Embossing Powder.


Basic Steps

  1. Prime a round wooden base
  2. Cover it with Polyester Linen Fabric using Soft Gel
  3. Brush on top a layer of White Heavy Gesso
  4. Mix white gesso with Cattail Copper Brown Magical. To make the mixture a bit gritty, add texture powder. Add Autumn Leaves Crimson Magical. Cover the chipboards with the mixture
  5. Color the big clay decoration with Pegleg Pete purple Spray
  6. Color two small frames with Cowabunga Copper Spray
  7. Softly add to the lace piece, Open Arms Amethyst Spray
  8. Add a piece of tissue paper to the base
  9. To add some texture, spread Paper paste with a stencil, quickly, before it dries, cover it with Imperial Crown Purple Gold Embossing Powder and heat emboss
  10. Add white Crackle Paste
  11. Rub the embellishments with Metalique waxes
  12. Assemble everything on the base with your favorite glue
  13. Add vintage laces
  14. Add a bit of Cowabunga Copper Spray
  15. Dry brush some White Heavy gesso

Note that Lindy's amazing vintage Moon shadow sprays have a gorgeous brownish shade together with another color which is fully revealed when dry.


Watch the creation process here:


Here are more photos and close-ups:


Lindy’s Products

Other products
  • Finnabair-Prima Paper Paste, Finnabair-Prima Manuscript Stencil, Finnabair-Prima White Crackle paste, Finnabair-Prima Fabric set, Finnabair-Prima Tissue paper,  Prima Moulds, Finnabair-Prima Copper Glass Glitter, Finnabair-Prima Microbeads, Finnabair-Prima Soft Gloss gel, Finnabair-Prima waxes, Fantasy chipboards
Thanks for stopping by!
xoxo

Oct 13, 2019

Rust Altered Box

Hello friends!
I noticed there are a few project I haven't shared here, so I decided to upload them.
hope you will enjoy it !

I will start with a box made for Ciao Bella Papers using my absolut favorite, the Collateral Rust Collection.


Thanks for stopping by!
xoxo

Industrial Heart Box for Dusty Attic

Hello carfty friends!
Anat here sharing my second project for October - a Heart shaped box inspired by the gorgeous moodboard.


43879385_10216517100461211_5615879338219012096_o

I started by priming the box using Heavy White Gesso, leaving brush strokes for some texture.
When dry I cut Industrial Corners and  adhered the pieces around the box, together with the smaller parts of the Jumbo Cogs set
On the lid I adhered Chicken Wire Panel.


Next I painted all box, with chipboards on, using Lindy's Hockey Puck Black Squirt.
This squirt is a Black with Blue Grey in it and I love it! I colred it unevenly, leaving darker spots and stains here and there.
After drying the paint I rubed Aged Brass and Red Amber Finnabair's Metalique waxes.


I brushed Industrial Barbed Stars and some cogs from the Jumbo Cogs set, with Finnabair Rust Paste and Hot embossed randomly, on top, a bit of  Stampendous Aged Green EP.
I also embossed the chipboards glued around the box.


I cut the embossed chipboards and adhered them on top of the Chicken wire. Next colored one compass from the Mini Compasses set using Lindy's Whale Watch Blue Spray. 
Last step was to adhere the compass and add Finnabair's mini hardware pieces.


Hope you like it!


Thanks for stopping by!
xoxo